I have found over the years, that Baking Soda, Vinegar, & Hydrogen Peroxide can pretty much do everything! :) They have been Green for years! lol
So here's a quick tip that you might need someday.
I don't know about everybody else, but many times I'm starting a project I'm in a hurry, i'm always squeezing stuff in, in my life. Like recently I decided to paint my vanity in my bedroom & my hutch. I did not have time to talk someone in to moving them for me, & I really didn't care about the pieces enough to truly prep them. Both are things that I have been wanting to get rid of for years, so any improvement in the items great.
One thing tho, I tend to change my mind OFTEN. I like such a gamut of things that I tire of things easily, and my creative mind always wants to try something different.
So this tip is how to strip paint OFF of hardware, hinges, screws, knobs etc. Anything that you might of decided to paint over without the necessary prep work, because at the time you didn't really care and it wasn't going to show anyway.
All you need to do is...
Put a quart of water onto the stove, add in 1/4 cup of Baking soda & let it boil.
Drop in your hardware with paint, it will most likely start to fizz & you will feel like a mad scientist doing a science project! ;) Wait about 15minutes, and then use tongs to pull out the first piece. The paint should show signs of peeling. lay it on a paper towel, & allow it to cool for a few minutes. Trust me that metal gets HOT - don't touch! Once it feels cool enough, You should be able to peel the paint right off. If not, do the process over.
This trick is something my Grams has sweared by for years.
Her favorite motto (& mine too!) ... If it doesn't move - Paint it! lol :)

Monday, November 22, 2010
Sunday, November 21, 2010
Super Easy Delicious Chocolate Pie
This is super simple & delicious. I'm posting in honor of Thanksgiving this week, so I have it handy. Try it, your family will think you are a star!
1 & ½ C sugar
4 heaping T Flour
8 T cocoa ( or 2 packets of redi blend)
1 t vanilla
3 C milk
3 egg yolks
½ stick margarine ( 2oz)
Mix sugar, flour and cocoa, add milk mixed with egg yolks, cook until thick. Remove from heat, add margarine and vanilla
Pour into a baked 9 inch oreo crust or pie shell. Bake 20 minutes at 325.
Top with Whip Cream.
Sweet Potato Casserole with Oatmeal Crumble Topping
My boys love yams. I'm posting so it will be handy this week.
6 cups mashed sweet potatoes (that’s about 5 or 6 sweet potatoes depending on how big they are)
3/4 cup brown sugar
1/2 teaspoon cinnamon
1/2 cup heavy cream
1/4 cup melted margarine
1/4 teaspoon salt
2 cups of mini marshmallows (which will be used later)
Preheat the oven to 350 degrees.
At this point your sweet potatoes should still be in the mixing bowl. Add in the brown sugar, the cream, the melted margarine, the cinnamon and salt. Mix well with a hand mixer until everything is mixed in. Then pour the mixture in to an 8 x 8 baking dish and spread it out equally around the dish.
Now make the Oatmeal Crumble.
1/4 cup rolled oats
2 tablespoons dark brown sugar
1 tablespoon all purpose flour
1/8 teaspoon ground cinnamon
2 tablespoons cold margarine
Preheat oven to 375°F.
In a food processor or blender place the oats in and pulse quickly two times; you just want to break them up just a little. Then pour the oats in to a bowl and put in the flour and cinnamon. Cut the butter up in to a few pieces and place in in to the bowl and then cut it into the oat mixture. Meaning take a fork and kind of mash it it to the mixture trying to incorporate it in to as much of the mixture as you can.
Sprinkle the topping over the sweet potatoes as evenly as possible and place the casserole in the oven and bake for about 55 minutes. Keep an eye on it though starting from about the 40 minute marker and the moment the crumble starts to get little brown remove it right away.
Then sprinkle on the two cups of mini marshmallows, cover it with aluminum foil and let it sit for 10 minutes giving the marshmallows a bit of time to melt in a bit
Saturday, November 20, 2010
Gharam Masala
Have you ever tried looking for Gharam Masala in your grocery and can't find it? I have, I haven't been able to find it anywhere.
 What is it? Gharam Masala from Hindi Gharam ("hot") and masala ("mixture") is a basic blend of ground spices common in Indian and other South Asian cuisines. It is used alone, or with other seasonings. The word gharam refers to spice intensity, not heat; gharam masala is pungent, but not "hot" in the same way as a chili pepper.
¼ cup Black cardamon pods
3 Cinnamon sticks, broken up
¼ cup Cloves
¼ Nutmeg seed, grated
¼ cup Black peppercorns
¼ cup Cumin seed
½ cup Coriander seed
1 cup Green cardamon pods, husked
2 Cinnamon sticks, broken up
¼ cup Cloves
1 tablespoon Nutmeg, grated
¼ cup Black peppercorns
1 cup Green cardamon pods
5 Cinnamon sticks, broken up
¼ cup Cloves
½ Nutmeg seed, grated
¼ cup Black peppercorns
½ cup Black cumin seed
½ cup Aniseed or fennel seeds
Here’s how to Prep everything, so that you can save & keep on hand the next time your recipe calls for a bit.
First, roast the spices in a small, heavy-based pan over a medium heat for 4-5 minutes, stirring constantly until they become a shade darker than their original color. The spices will also give out a distinct aroma and the pan will emit light fumes of smoke.
Next, remove the spices from the pan and grind them to a fine powder in a coffee grinder.
This will keep well when stored in an airtight jar for up to 6 months.
 What is it? Gharam Masala from Hindi Gharam ("hot") and masala ("mixture") is a basic blend of ground spices common in Indian and other South Asian cuisines. It is used alone, or with other seasonings. The word gharam refers to spice intensity, not heat; gharam masala is pungent, but not "hot" in the same way as a chili pepper.
Over time I have put together a list of spices that are in in, and thought I would share here with you.
5 Cinnamon sticks, broken up
2 tablespoons Cloves¼ Nutmeg seed, grated
¼ cup Black peppercorns
¼ cup Caraway or cumin seed
½ cup Green cardamom pods, husked
2 tablespoons Black cardamom pods, husked3 Cinnamon sticks, broken up
¼ cup Cloves
¼ Nutmeg seed, grated
¼ cup Black peppercorns
¼ cup Cumin seed
½ cup Coriander seed
1 cup Green cardamon pods, husked
2 Cinnamon sticks, broken up
¼ cup Cloves
1 tablespoon Nutmeg, grated
¼ cup Black peppercorns
1 cup Green cardamon pods
5 Cinnamon sticks, broken up
¼ cup Cloves
½ Nutmeg seed, grated
¼ cup Black peppercorns
½ cup Black cumin seed
½ cup Aniseed or fennel seeds
Here’s how to Prep everything, so that you can save & keep on hand the next time your recipe calls for a bit.
First, roast the spices in a small, heavy-based pan over a medium heat for 4-5 minutes, stirring constantly until they become a shade darker than their original color. The spices will also give out a distinct aroma and the pan will emit light fumes of smoke.
Next, remove the spices from the pan and grind them to a fine powder in a coffee grinder.
This will keep well when stored in an airtight jar for up to 6 months.
Wednesday, November 17, 2010
Blowing thru the JASMINE in my mind...........


So yesterday I was at Michaels picking up more silver paint for my hutch redo, and I found these little spray bottles. I immediately thought, perfect size.. I can make some homemade air freshner!
So in literally less than 5minutes this morning. I gathered a 3 items, the bottle, vodka, & the Jasmine oil.


Voila, a really inexpensive air freshner or perfume, that I can't get enough of. :)
The awesome thing with this recipe is, essential oils come in all scents. Many have aromatherapy benefits. Choose the one you love and follow the steps above.
These would also make inexpensive hostess gifts, etc. Get a pretty bottle, make a nice label, a little bit of ribbon. Today I went down the Vodka aisle at the grocery store and found you can get quite a nice size bottle for 3.99. A bottle that size along with some essential oil could make several dozens of these.
I so love this project. My whole house smells like fresh vacation. I'm thinking I'm going to go back and pick up some lemon oil. Another clean fresh smell I love. Lavendar would be great in guest room, as Lavendar provides a cozy and restful benefit.

NOTE: Another quick way to use a few drops of essential oil is to put it on a cotton ball and then wipe on to your lightbulbs. When your turn on the light, it will emit the smell. Also works on candles, sprinkle a little bit and when you light them, it will also give off the scent.
Great Green way to freshen up your home.
Sunday, November 14, 2010
Silver Vase
More silver leaf. I love the vases that I'm seeing in all the magazines. I picked up this clear glass vase for a buck from the dollar store, and used few sheets of Aluminum leaf inside of it, and voila  I love the way it turned out!
 I love the way it turned out!
Vanity Tray Redo
I decided to repurpose this turqoise plastic tray that I used for an "Easter Basket" so long ago. Since I'm into the silver finishes, I decided I would try my hand at gilding. I had help my dad Gold leaf a large floor to ceiling mirror when I was a young girl, and remember it to be a tedious yet very rewarding process. As much as I love silver, I decided to use Aluminum leaf, because it never tarnishes, and the finish is a little brighter, which works great when you want to tone it down with a little raw umber & black glaze.
Here is what I did. I put the sizing liquid on it, and let it set up for 12hrs.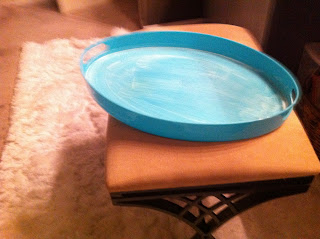

From everything I read, I knew it was a messy project. So I got a garbage bag and cut it open, and began. As you can see the silver/Aluminum is very thin

I bought a book of 500 sheets. They actually go quite far, i only used the first pack (25sheets per pack) to do the entire tray and still had 5 sheets left in the pack.
 Carefully layout each piece onto the already sized surface. You can smooth out with a paint brush, or use your hands. I like to use my fingers as I felt like I had more control. My surface had small edges, handle cutouts, and lip where the plastic went in and out, using my fingers I was able to use more of the leafing in these areas without wasting it. I used a brush at the end to smooth the areas.
Here is the finished result. 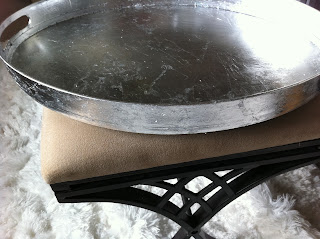

I love it!
Metallic Cabinet Redo

So I went to Lowe's picked up a cabinet, then I went to Michael's and picked up a bottle of silver Metallic craft paint, 16oz. and the creating began. You just can't imagine how much I love doing stuff like this.
I forgot to get a before shot, but just think of a completely unfinished cabinet, and here is the after...
 I wish that it was a little taller. I would like to rip those bright vanity lights down, but I really have no idea how to do electrical work, so for now, i'm leaving them alone.
 I added this decorative paper on the front in 12x12 squares to cover the "unfinished oak wood grain" that is so prevanlent in cheap unifinshed cabinets from the store. It picks up the other colors in the room and just gives it a little pop. Remember its just a temporary fix until I can make the real changes I'm wanting to do, and for now I'm loving it! :)
VANITY BEFORE 

In fact, i loved it so much that I decided the next morning to tackle the vanity. Since it was laminate I thought I better sand and prime it. Because of that prep work, the finish turned out darker, but equally stunning.
VANITY AFTER

Thursday, November 11, 2010
Hot Vanilla

Last night I was craving something hot. I am not a coffee drinker, just do not like that stuff on any level, not even the foo foo drinks my girlfriends drink! The night before I tried some hot Tea, but really that's not my thing either. I LOVE hot chocolate, but let's face it, its not great to drink that every night thru the winter, or I'm going to pick up some extra pounds. After all... the day is finally over and I'm typically ready to collapse at this point. Anyhow... my cravings were getting the best of me, when I had the idea, to take some French Vanilla Coffee Mate, and add it to milk. I have one of those Bialetti Hot Chocolate makers, and trust me it is worth every dime. It makes THE BEST Hot Chocolate on earth, which is far superior to Hot Cocoa (which btw.. are really two entirely different things) nonetheless it also makes many other things, and last night I decided to go with the vanilla coffee Mate as is fat free, next time I will have to look into getting the low sugar.
Here's what I did,
10oz of 1% milk
1/4C French Vanilla Coffee mate
2tbsp of Malt Powder
mini marshmallows (optional)


Turn it on, and voila, it was literally scrumptions without the guilt. OMG, I could see drinking this every night. Now if you don't have a Bialetti maker to do this in, you could do the same thing with a pot on the stove, warm up the milk, add the ingredients, and stir well. It won't be as frothy as the maker, but i'm guessing it will still be mighty delicious for a night cap without the guilt.
I'm also betting that a little bit of white chocolate Godiva liquer could take this drink to a whole new level! (Actually made it again tonight so I could add pics, & put the Godiva in, & YUM-O!)
Serve with or without mini marshmallows on top and even a little bit of fresh nutmeg, that stuff screams holiday goodness. :)
Enjoy!!
Sunday, November 7, 2010
Hummingbird Cake
This is an easy fake out of a traditional Hummingbird cake. My boys do not like nuts, so I added in mini choc. chips instead for a little bit of crunch. This is really different, and ice cream added to a cake sounds crazy, it is really good. All the fat in the ice cream works to bring a rich flavor to this cake.

1 box Pineapple upside down cake
1C. Carmel Salted Ice cream
1C. Vanilla Ice Cream
3 Eggs
3 lg. bananas
mini choc. chips (you can substitute nuts if you prefer)
Put all ingredients in your kitchen aid mixer, beat for 1min. on low, scrape down the sides and beat 2additional minutes on high, until well mixed and thick.
 Spray bundt cake pan well with pam. Bake at 350 for 45minutes. Test cake for doneness, I like to use a strand of spaghetti, if it comes out clean, then its done, if not, Add 5-10 extra minutes to baking time, doing it in 5minute intervals.
*****************************************************************
Amaretto Cinnamon Glaze
1/2c Confectionary sugar
2 capfuls of Amaretto
3Tbsp of milk
1/2 capful of Starbucks Cinnamon Dolce Syrup
2 handfuls of mini marshmallows
Mix well, nuke in microwave for 1minute, stir, and nuke for another 30seconds. Watch to make sure it does not bubble over.
Pour over cake, or if you prefer over each individual slice.

1 box Pineapple upside down cake
1C. Carmel Salted Ice cream
1C. Vanilla Ice Cream
3 Eggs
3 lg. bananas
mini choc. chips (you can substitute nuts if you prefer)
Put all ingredients in your kitchen aid mixer, beat for 1min. on low, scrape down the sides and beat 2additional minutes on high, until well mixed and thick.
 Spray bundt cake pan well with pam. Bake at 350 for 45minutes. Test cake for doneness, I like to use a strand of spaghetti, if it comes out clean, then its done, if not, Add 5-10 extra minutes to baking time, doing it in 5minute intervals.
 Let cool for 30minutes, then invert cake. Cool for 20 additional minutes before serving.
NOTE: VARIATIONS: You can use 2C of your favorite flavors of ice cream with
white, yellow, or Chocolate cake, and the possibilities are pretty endless.
*****************************************************************
Amaretto Cinnamon Glaze
1/2c Confectionary sugar
2 capfuls of Amaretto
3Tbsp of milk
1/2 capful of Starbucks Cinnamon Dolce Syrup
2 handfuls of mini marshmallows
Mix well, nuke in microwave for 1minute, stir, and nuke for another 30seconds. Watch to make sure it does not bubble over.
Pour over cake, or if you prefer over each individual slice.
Panzanella Soup

Did I mention yet, how souper easy this is? Seriously, it takes under 20minutes, and then just a little simmer and voila, you are ready to serve up a tasty bowl of goodness.
2 Zucchini's
2 Yellow Squash
1 Large Onion
2 Tbsp Butter
1/4 tsp Garlic Powder
Tone's Canadian Steak Spice
1 Pkg Tones Chicken Gravy
1 Can Cream of Chicken Soup (I use reduced fat)
2 boxes of Chicken Broth (again I use 1box reduced fat & 1 box low sodium)
Panetini (Italian Bread Toast) If you can't find this, Croutons will work also.
Shredded Swiss Cheese or Shredded Parmesan (for Garnish)
First cut all your veggies into slices. I like to use the food processer so they are all the same thickness.
Melt Butter in your pot, and then add in Zucchini, Squash, and Onion. Let it saute nicely till its almost browned.

Next add garlic powder, & a healthy dash (I go kind of heavy, because we like it spicy) of Canadian Steak Spice (you can purchase this in buld at Sam's Club) its great to have on hand for many dishes. This really adds a lot of flavor. Stir, and mix the veggies all in it.
Now Add the Cream of Chicken Soup, mix well, then add in the chicken broth, then add in the chicken gravy. If you like you can reserve a coffee cup full of chicken broth and add the gravy mix to it, so that you can get it all mixed in with no lumps. I on the other hand just stir really fast and mash any lumps I see forming. Either way works.


Crumble a few extra Panetini pieces/croutons, & sprinkle a little parmesan or swiss cheese over top, the cheesy ooey goeyness mixes in with the bread nicely.
I'm telling you this Panzanella Soup is really delicious!

Saturday, November 6, 2010
Ten + One Surprising Uses for Lemons
In my home, I almost always have a big bowl of bright yellow lemons. Partially just because I love the way they look, they just bring a little "zest" into a space. Really lemons, aren't just for show- lemons serve a million purposes around the house from cooking ( I use the frquently) to cleaning. Here are just some of the myriad things you can do with them.

This is my favorite tip as it can be a real life saver, so I'm calling it THE Plus One Tip:
Truly it is one of the best tips I have ever come across, as I used to have chronic ear infections. My Allergist (Dr. Kriendler) once told me to mix equal parts of lemon Juice & Rubbing Alcohol, and put into my ears after I bathe, or swim. I started using this so much that I put the mixture into a little squeeze bottle, & kept it in the medicine cabinet. I stopped having ear infections ever since, and when I feel one coming on, I start using this immediately. The Lemon juice kills the bacteria, & the rubbing alcohol dries any water in your ear canal. This worked for my niece at Disney a few years ago, when they couldn't get to a doctor fast enough, my kids, and countless friends.
2. Whiten: Add a 1:1 mixture of water and lemon juice to fade tough stains (like those yellow underarm ones), or add 1/2 cup of lemon juice to the washer to whiten a whole load.
3. Shine: Sprinkle half a lemon with salt and scrub to shine up the insides of copper and stainless steel cookware or sinks.
4. Soothe Your Throat: Mix a 1:1 ratio of lemon juice and hot water for a tea that will soothe a sore throat. Follow with a teaspoon of honey.
5. Freshen Your Breath: for an impromptu mouthwash when you feel like you've been sucking on dirty gym socks, rinse your mouth with lemon juice- the acid will kill the stinky bacteria. Afterward, be sure to rinse with water to protect your teeth from the acid. Or, chew on a bit of the rind.
6. Clear the Air: When you follow your nose to find last month's Chinese leftovers in the back of the fridge, or the garbage can starts getting rank, soak a cotton ball in lemon juice and put it in the fridge or can. After a few minutes the bad smells will have disappeared.
7. Highlight Your Hair: Mix a 1:3 ratio of lemon juice to water and wet your hair with it. Sit in the sun until your hair dries completely. Results will be subtle. (Not recommended for brunettes).
8. Drive Away Pests: Wash your floors with a 1:10 ratio of lemon juice and water to drive off ants and roaches (no, it won't make the floor sticky).
9. Heal Bug Bites and Cuts: Rub lemon juice on bug bites to kill the sting or itch, or into cuts (if you can stand the pain) to disinfect and heal.
10. Fix Up Your Hands: Rub a lemon wedge on your hands to remove the odor from cutting onions or garlic, or stains from beets or berries. This also works to whiten fingernails that are yellowed from polish.
In other words, when life gives you lemons, clean your house, beautify, and heal yourself. Or, you could just make Lemoncello, I will post this recipe next time! :)
Thursday, November 4, 2010
CHOCOLATE GRAVY
What could be better than, Chocolate Gravy! This is a rich, dark chocolate sauce is quite a traditional accompaniment for biscuits in the South. It’s also great on pancakes, ebilskivers, waffles, fruit.
Mmmmm an excuse to eat chocolate for breakfast? Don't you just wanna give that person a hug down south that came up with this! I'm betting she was also voted by her kids & their friends as best Mom on the planet! ;) Try it, you too can get the vote!

8 tbsp. unsalted butter
1 cup sugar
1⁄2 cup cocoa powder
1⁄4 cup flour
2 cups milk
1⁄2 tsp. vanilla extract
1. Melt the butter in a 2-qt. -saucepan over medium-high heat. Whisk together the sugar, cocoa, and flour in a bowl; add to the melted butter; whisk. Slowly add milk, whisking constantly, until smooth.
2. Bring to a simmer; cook until thick, 2–3 minutes. Whisk in vanilla.
MAKES ABOUT 2 1/2 CUPS
Katharine Hepburn’s Brownies

A version of this recipe accompanied an interview with the actress Katharine Hepburn in the August 1975 issue of The Ladies' Home Journal. This brownie recipe (shown in the middle), which calls for the smallest amount of flour, produces incredibly chewy bars with a full but mellow chocolate flavor
8 tbsp. unsalted butter,
plus more for greasing
2 oz. unsweetened chocolate
1 cup sugar
2 eggs, beaten
1⁄2 tsp. vanilla extract
1 cup roughly chopped walnuts
1⁄4 cup flour
1⁄4 tsp. fine salt
1. Heat oven to 325°. Grease an 8" x 8" baking pan with butter. Line the pan with parchment paper; grease the paper. Set the pan aside.
2. Melt the butter and the chocolate together in a 2-quart saucepan over low heat, stirring constantly with a wooden spoon. Remove the pan from heat and stir in the sugar. Add the eggs and vanilla and stir to make a smooth batter. Add the walnuts, flour, and salt; stir until incorporated. Pour the batter into the baking pan and spread evenly. Bake until a toothpick inserted into the center comes out clean, 40–45 minutes. Let cool on a rack. Cut and serve.
MAKES 9 BROWNIES
This article was first published in Saveur in Issue #113
Wednesday, November 3, 2010
Tres Leches Cake

Vegetable oil spray for misting the pan
1 package (18.25 ounces) plain yellow cake mix
1 package (3.4 ounces) vanilla instant pudding mix
1 cup milk
1 cup vegetable oil
4 large eggs
Milk syrup:
1 can (12 ounces) evaporated milk
1 can (14 ounces) sweetened condensed milk
1 cup heavy cream
1 teaspoon vanilla
1 tablespoon rum, if desired
1. Place a rack in the center of the oven and preheat the oven to 350 degrees. Lightly mist a 13- by 9-inch baking pan with vegetable oil spray. Set the pan aside.
2. Place the cake mix, pudding mix, milk, oil, and eggs in a large mixing bowl. Blend with an electric mixer on low speed for 1 minute. Stop the machine and scrape down the sides of the bowl with a rubber spatula. Increase the mixer speed to medium and beat 2 minutes more, scraping the sides down again if needed. The batter should look well blended. Pour the batter into the prepared pan, smoothing it out with the rubber spatula. Place the pan in the oven.
3. Bake the cake until it is golden brown and springs back when lightly pressed with your finger, 32 to 34 minutes. Remove the pan from the oven and place it on a wire rack to cool for 2 hours.
4. When cake has thoroughly cooled, pierce it all over the top with the tines of a fork or a wooden skewer. The holes should completely cover the top.
5. For the syrup, whisk together the milks, cream, vanilla, and rum (okay to omit) in a medium bowl. With a large spoon or ladle, spoon this milk syrup over the cake and let it soak into the cake before spooning on more. Continue spooning on syrup until all has been used.
6. Cover the cake with plastic wrap and chill for 2 hours before serving.* Slice and serve with a dollop of sweetened whipped cream, or just as is.
*NOTE: I actually like to refrigerate overnight and let cake absorb leches.
I also like to sometimes substitute the rum, & add a dash of cinnamon, dash of grated orange peel, and 2 tbps of Grand Marnier Liqueur. The orange flavor balances out the sweetness, with just the right amount of tang.
Subscribe to:
Posts (Atom)